Blog
Learn How To Tie Your Ghillie Brogues

Ever wondered about the secret to perfectly tied Ghillie Brogues? Well, wonder no more! In this easy-to-follow guide, we’ll unravel the mystery behind the art of lacing up your Ghillie Brogues with style and flair.
Tying your Ghillie Brogues isn’t just about keeping your shoes snug – it’s about making a statement. Whether you’re gearing up for a special event or simply want to add a touch of tradition to your daily attire, mastering ‘How to tie your Ghillie Brogues’ is a must. Let’s dive into the world of knots and loops, ensuring your steps are not just confident but impeccably stylish!
How to Tie Your Ghillie Brogues (Step by Step Guide)
Brief Explanation of Ghillie Brogues
Ghillie Brogues, traditional Scottish footwear, are a unique blend of style and culture. These shoes, often worn with kilts, feature distinctive brogueing, which are decorative perforations. Ghillie Brogues are renowned for their timeless design and comfort. The shoes typically have long laces that wrap around the ankles, adding to their distinctive appearance. Understanding the anatomy of Ghillie Brogues is essential before delving into the art of tying them.
Importance of Tying Them Properly
Tying Ghillie Brogues correctly is more than a matter of aesthetics; it’s a nod to tradition and practicality. The proper tie not only enhances the overall look but also ensures a secure and comfortable fit. The intricate lacing style contributes to the shoe’s stability, preventing slips and discomfort during wear. Additionally, a well-tied Ghillie Brogue complements the overall ensemble, showcasing attention to detail and respect for cultural traditions. Whether for a formal event or casual wear, mastering the art of tying Ghillie Brogues adds a touch of sophistication and ensures you carry yourself with confidence and style.
See Here: Leather Kilt Shoes: Order Ghillie Brogues Online Now
Types of Ghillie Brogues
Overview of Different Styles
Ghillie Brogues come in various styles, each with unique characteristics that cater to different preferences and occasions. The Traditional Ghillie is the classic choice, featuring long laces that wrap around the ankles. The Ghillie Brogue Oxford, on the other hand, combines the traditional style with a more formal look, making it suitable for dressier occasions. For those seeking a contemporary twist, the Ghillie Sneaker merges comfort with a casual aesthetic, offering a versatile option. Understanding the nuances of these styles allows you to choose the perfect pair that complements your individual taste and the specific event.
Choosing the Right Type for Your Outfit
Selecting the right type of Ghillie Brogues is crucial to achieving a harmonious and polished look. For formal occasions such as weddings or formal gatherings, the Traditional Ghillie or Ghillie Brogue Oxford is an excellent choice, providing a touch of sophistication. If the dress code is more relaxed, the Ghillie Sneaker offers a modern and comfortable alternative.
Consider the color, material, and overall style of your outfit to ensure a seamless integration with your chosen pair of Ghillie Brogues. By aligning your footwear with your attire, you elevate your overall appearance and make a stylish statement.

Preparing Your Ghillie Brogues
Ensure Brogues are Clean and Dry
Before diving into the art of tying your Ghillie Brogues, it’s crucial to start with a clean and dry pair of shoes. Wipe off any dirt or debris using a soft brush or cloth. Pay attention to the brogueing details, ensuring they are free from any residue. Allow your Ghillie Brogues to air dry thoroughly before attempting to tie them. A clean and dry foundation not only enhances the overall appearance but also ensures that the laces can be secured tightly without interference from dirt or moisture.
Check for Any Damage or Loose Parts
Before embarking on the lacing journey, inspect your Ghillie Brogues for any signs of damage or loose components. Check the stitching, sole, and brogueing details for any issues that may compromise the integrity of the shoe. Tighten or repair any loose parts to ensure a secure and comfortable fit. Addressing potential problems beforehand prevents discomfort during wear and ensures that your Ghillie Brogues maintain their longevity. By taking the time to assess the condition of your shoes, you contribute to a smooth and enjoyable experience when tying and wearing your Ghillie Brogues.
Step-by-Step Guide on Tying Ghillie Brogues


Lacing Techniques
Cross-lacing Method
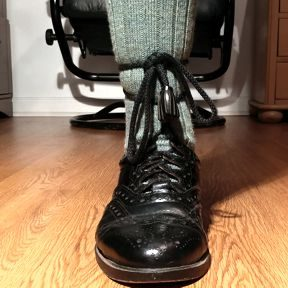
Begin by threading the lace through the bottom eyelets, crossing them over each other. Continue lacing upwards, crossing the laces in an X pattern. Once you reach the top, secure the laces by tying a bow. The cross-lacing method provides a secure fit and adds a touch of elegance to your Ghillie Brogues.
Traditional Crisscross Method
Start by threading the lace through the bottom eyelets, crisscrossing them as you work your way up. Maintain a consistent crisscross pattern until you reach the top eyelets. Tie a bow to secure the laces. The traditional crisscross method offers a classic look and ensures a snug fit for your Ghillie Brogues.
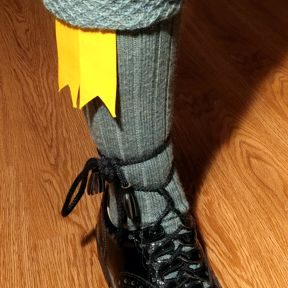
Securing the Ankle
After lacing your Ghillie Brogues, focus on securing the ankle. Adjust the tension of the laces to provide adequate support without restricting movement. The proper ankle security enhances the overall comfort and stability of the shoes, ensuring a confident stride.
Adjusting the Tightness for Comfort
Achieving the right tightness is crucial for comfort. Ensure that your Ghillie Brogues are snug but not overly tight. Tighten or loosen the laces as needed to accommodate the natural contours of your foot. Pay attention to the pressure around the ankle and instep, making adjustments until you find the perfect balance between style and comfort. By mastering the art of adjusting tightness, you’ll not only look sharp but also feel at ease in your perfectly tied Ghillie Brogues.
Troubleshooting Common Issues
Loose Laces
If you find that your Ghillie Brogue laces are persistently coming undone, consider adjusting your tying technique. Ensure that the initial knot is tight and secure. Experiment with double knots or using alternative methods, such as wrapping the laces around the ankle an extra time before tying. If the issue persists, you might want to invest in slightly longer laces to provide more material for a secure tie.
Unevenly Tied Brogues
Unevenly tied brogues can detract from the polished look you’re aiming for. To address this, start by carefully inspecting the lacing on both shoes. Re-lace them, paying close attention to maintaining symmetry. Take your time to tighten each side evenly, ensuring a balanced appearance. If needed, redo the lacing, making adjustments to achieve a uniform and aesthetically pleasing tie.
Slipping While Walking
If you experience slipping while walking in your Ghillie Brogues, it may be due to improper tension or an insecure knot. Revisit the lacing and ensure the tension is consistent across both shoes. Consider using a double knot or experimenting with alternative tying techniques to enhance the stability.
Additionally, make sure your Ghillie Brogues are the correct size, as an improper fit can contribute to slipping issues. Troubleshooting and addressing these common problems will not only improve the aesthetics but also enhance the overall comfort and functionality of your perfectly tied Ghillie Brogues.
Tips for Maintenance
Cleaning and Caring for Your Ghillie Brogues
To maintain the longevity and appearance of your Ghillie Brogues, regular cleaning is essential. Use a soft brush or cloth to remove dirt and debris, paying extra attention to the brogueing details. For stubborn stains, a mild solution of soap and water can be used, but avoid saturating the leather.
Allow your shoes to air dry naturally, and consider applying a quality leather conditioner to keep the material supple and prevent cracking. Periodic polishing will enhance the shine and provide an extra layer of protection.
When to Replace Laces
Ghillie Brogue laces, subjected to constant tying and wear, may fray or lose their integrity over time. Replace laces if you notice significant fraying, breakage, or if they become too short to tie securely. Opt for high-quality replacement laces that match the style and length of the original ones. Regularly checking and replacing laces ensures that your Ghillie Brogues remain securely tied and maintain their overall aesthetic.
Storing Them Properly
Proper storage is crucial to preserving the shape and condition of your Ghillie Brogues. When not in use, place shoe trees inside to maintain their form and absorb moisture. Store them in a cool, dry place, away from direct sunlight. Avoid placing heavy objects on top of the shoes, as this can deform the structure.
Consider using shoe bags to protect them from dust and scratches during storage. By following these maintenance tips, you’ll not only extend the life of your Ghillie Brogues but also ensure they always look their best.
FAQs:
Q:1. How do you lace Scottish Ghillies?
To lace Scottish Ghillies, start by threading the laces through the bottom eyelets, crossing them over in an X pattern as you work your way up. The laces should wrap around the ankle, providing a secure fit. Once you reach the top, tie a bow to secure the Ghillie Brogues. Experiment with different lacing techniques like the cross-lacing method or traditional crisscross for variations in style and comfort.
Q:2. What is the difference between Ghillie Brogues and Brogues?
The main difference lies in their design and purpose. Ghillie Brogues are a type of traditional Scottish footwear often worn with kilts. They feature distinctive brogueing (decorative perforations) and long laces that wrap around the ankles. On the other hand, “Brogues” is a broader term referring to any shoe with decorative perforations, and it includes various styles such as dress shoes, oxfords, and loafers, not necessarily associated with Scottish tradition.
Q:3. How do you break in Ghillie Brogues?
Breaking in Ghillie Brogues involves wearing them gradually to allow the leather to mold to your foot shape. Start by wearing them for short periods, gradually increasing the time. To expedite the process, you can use a leather conditioner to soften the material. Focus on areas that may initially feel tight, and consider using a shoe stretcher for targeted stretching. Regularly check for signs of discomfort or pressure points and make adjustments as needed during the breaking-in period.
Q:4. Do you tie a Ghillie shirt?
Unlike Ghillie Brogues, a Ghillie shirt typically does not require tying. Ghillie shirts are characterized by their loose, flowing design, often featuring a laced-up front with eyelets and leather thong. To wear, simply thread the thong through the eyelets and tie a secure bow or knot. Adjust the tightness according to your preference for comfort and style.
Q:5. Why do Ghillie Brogues have no tongue?
Ghillie Brogues are designed without a tongue to provide a more open and breathable construction. The absence of a tongue allows for easier adjustment and customization of the tightness around the ankle. This design is well-suited for traditional Scottish attire and provides a distinctive look, contributing to the unique and stylish appearance of Ghillie Brogues.
Conclusion:
In conclusion, mastering the art of “How to tie your Ghillie Brogues” is not just about securing your shoes; it’s a journey into tradition, style, and personal expression. From selecting the right type of Ghillie Brogues to understanding various lacing techniques, each step plays a role in achieving a polished and confident look. The importance of proper preparation, troubleshooting common issues, and maintaining your Ghillie Brogues contribute to the overall experience.
By following the step-by-step guide and incorporating valuable tips, you ensure not only a snug fit but also a nod to tradition and a touch of sophistication in every step. So, lace up with confidence, and let your Ghillie Brogues make a stylish statement wherever your journey takes you.